Making Hay: Guidance Through Agricultural Testing
First cutting is starting to come in for NIRS analysis here at Ward Laboratories, INC. That means it’s the season for making hay! So, let’s take a look at how agricultural testing can help producers make quality hay from seeding to feeding!
Match the hay production system to resources and environment.
Observe the field intended for haying and surrounding area. Consider: climate, physical barriers, irrigation potential, soil type, weed presence and other attributes of the field. Choose a plant variety to match the characteristics of the field.
Test soil before planting.
A soil report will guide fertility management. It will provide recommendations for fertilization. Proper fertilization can aid in early growth, stand establishment and persistence.
Use Lime Quality Analysis and Manure or Fertilizer reports to apply proper levels of nutrients before seeding.
Applying optimal levels of nutrients is more economical. Amendments can be a major input cost in hay production. Additionally, proper fertilization can improve both yield and quality.
Plant the hay variety to match the field.
Seed the field with the variety of alfalfa, grass or mix that best suits the environment. Some things to consider when determining what to plant are winter hardiness, fall dormancy, disease resistance and yield potential.
Monitor plant growth and use tissue tests for further fertilization recommendations.
A routine plant analysis can identify any underlying nutrient issues. These subtle problems are not easily detected through soil testing. Furthermore, monitor plant growth to decide when to cut.
Cut for Hay!
Cutting time should be determined by the plant’s growth stage. For grass hays cut before the plant has produced seeds. I commonly hear producers say, “before it has headed out”. This approach will produce both high yield and good quality hay. For alfalfa, harvest in late budding will result in high quality hay. However, to improve stand persistence, legumes should be allowed to flower before one of the harvest times. Many producers allow first cutting to reach 10% bloom. They sacrifice some yield and quality, but make up for it in later cuttings and a longer rotation of alfalfa in that field.
In addition to calendar cutting time, time of day is also important. There are two schools of thought. Some producers like to cut in the morning to take advantage of a full day of sunshine for rapid drying. Others cut in the afternoon to take advantage of the high sugar content of the hay for a higher Relative Feed Value (RFV).
Cutting height can also affect RFV. Typically alfalfa is cut between 2-4 inches high to maximize yield. A grass hay should never be cut lower than 3 inches to maximize yield. Grass can be cut even higher for improved quality, however, yield is sacrificed. The higher the cutting height the higher the quality of hay. Higher cutting heights result in a higher leaf to stem ratio. Stems have more structural fiber while leaves have more sugars and protein.
Condition the hay to reduce dry time.
Mechanically conditioning hay can reduce dry time by 1/2. Reduced dry time is favorable to prevent nutrient losses through plant respiration. Roller conditioners are best for legumes such as alfalfa or clover. Other types of conditioners deplete RFV through leave loss.
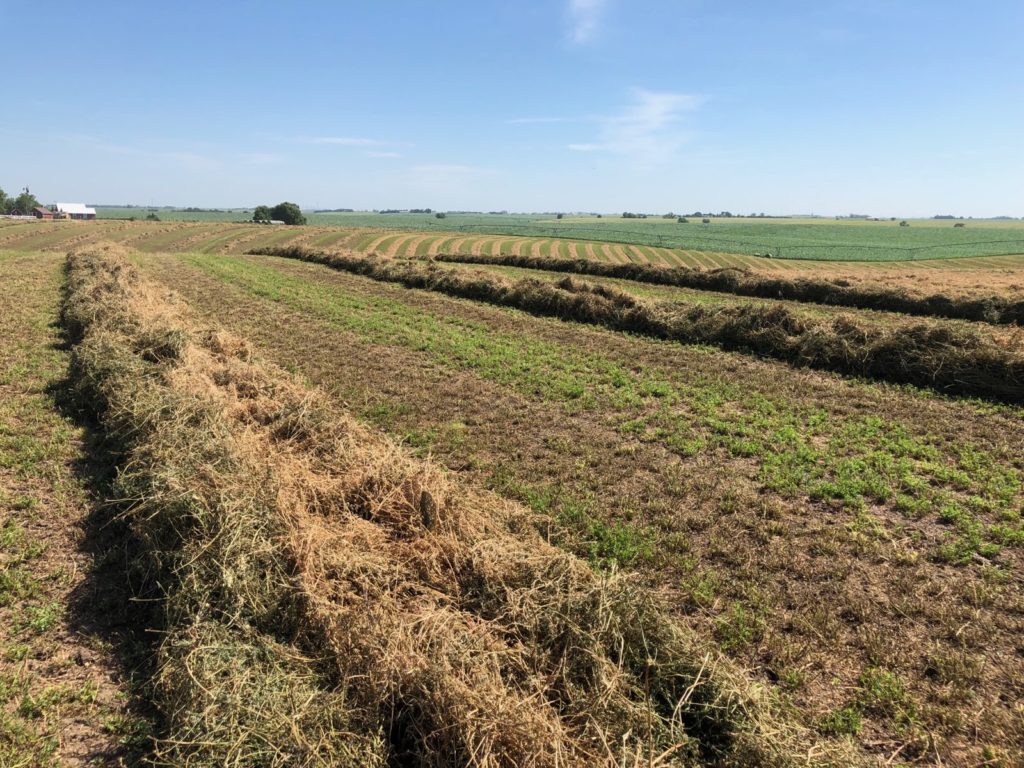
Create wide even swaths.
Wide even swaths increase exposure to sunlight. Sunlight is crucial to rapid dry time. Quick dry time reduces plant respiration and therefore preserves soluble carbohydrates which contribute to a high RFV. It is recommended that swaths cover approximately 60% of the cut area.
Rake Swaths into rows that match the width and density of the baler.
Alfalfa should be raked when it is at 40% moisture to avoid leaf loss. If it is too dry the leaves will be brittle and their fine particles will be lost. As a result RFV will be reduced. If the window for raking at 40% moisture has passed, rake early in the morning when dew is on the hay to preserve the leafy portion of the hay. Alfalfa usually reaches 40% moisture approximately 24 hours after cutting.
Grass should be raked at around 25% moisture as leaf loss is not as much of a concern.
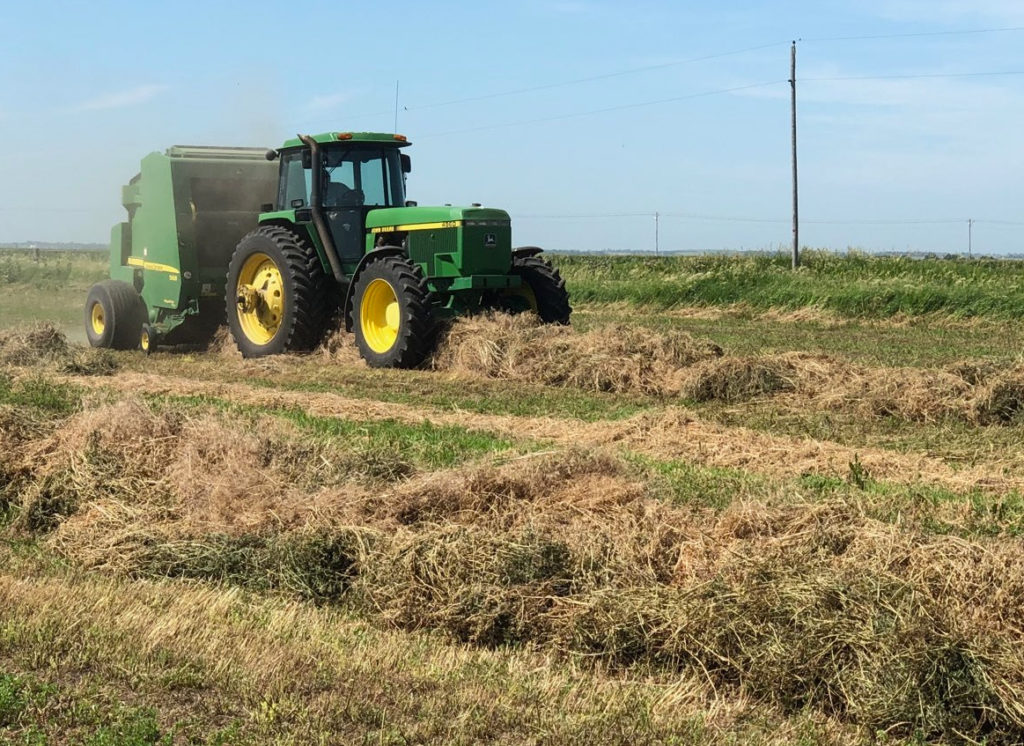
Bale the windrows.
After swaths have been raked into windrows to match the baler, baling should proceed efficiently. To avoid mold and heat damage, bale once hay is dry. For small square bales, moisture should be less than 18%. For larger bales, moisture should be between 14 -15% or dryer.
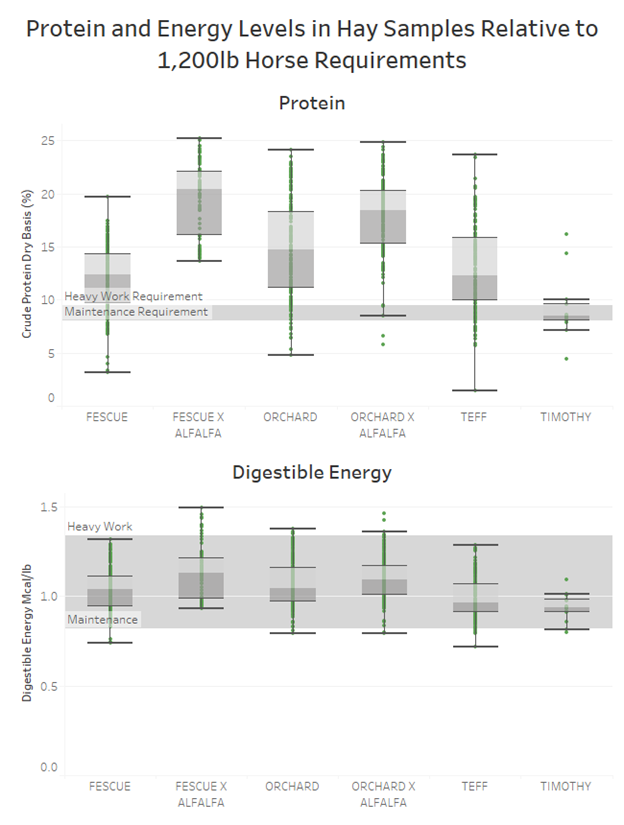
Use NIRS analysis to determine the quality of the hay
NIRS is a quick way to measure the nutrients in the hay. Ward Laboratories, INC. NIRS analysis uses equations from the NIRS Feed and Forage Consortium. Nutrients on the report include: Crude Protein, ADF, NDF, TDN, Net Energies for beef cattle, NDF digestibility at 48 hours, Fat, Ash, Starch, Water Soluble Carbohydrates, Ethanol Soluble Carbohydrates, and more.
Store hay properly.
A lot of work and proper timing goes into making quality hay. Don’t let it go to waste. Store hay properly by protecting it from the elements. Wind and rain can damage hay. Store hay under a cover whenever possible.
In conclusion,agricultural tests are available for every stage of hay production. Use data to guide management decision. Making hay is an art and a science.